Tile Spacers (Cross Spacers for Tiles)
One of the key elements in enhancing the aesthetic appeal of tile and ceramic flooring, in addition to the design and pattern of the tiles themselves, is achieving uniform and consistent grout lines. When the spacing between tiles is even and the joints (where the corners of four tiles meet) form perfect “+” shapes, the visual impact of the tiling is significantly enhanced.
To ensure precise spacing between tiles, plastic spacers, known as tile spacers or cross spacers, are designed and manufactured in various sizes. These spacers are cost-effective and highly efficient tools for achieving uniform spacing between tiles and ceramics, which not only improves the overall appearance of the tiling but also increases the speed of installation.
Tile spacers are available in sizes ranging from 1mm to 10mm. Typically, sizes between 2mm and 6mm are used for flooring, while sizes from 7mm to 10mm are better suited for wall tiling. In cases where decorative grout lines are desired using colored powders, tile spacers prove especially useful in ensuring precise alignment and spacing of grout joints.
Key Features of Tile Spacers
Material Waste Reduction: Using tile spacers reduces material waste, which in turn significantly lowers project costs.
Enhanced Precision: Tile spacers improve the accuracy and craftsmanship of the work.
Reduced Workforce Requirements: They minimize the need for additional labor.
Faster Installation: They increase the speed of installing tiles, ceramics, stones, and bricks.
Symmetry and Aesthetics: They help create symmetrical, organized grout lines, significantly enhancing the final appearance of the building.
Project Efficiency: Using spacers helps expedite project completion within a shorter timeframe.
How to Use Tile Spacers
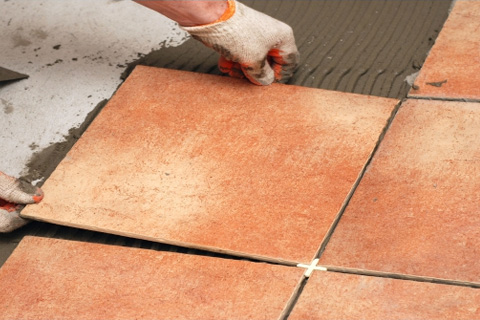
Prepare the Surface: Begin by applying tile adhesive using a notched trowel evenly across the substrate. Level the tiles from one side and start laying them systematically.
Placing the Spacers: Position the tile spacers precisely at the intersection of tiles to ensure consistent spacing.
Remove the Spacers: Once the tiles are set and the adhesive is semi-dry, remove the spacers carefully using a pointed object.
Grouting the Joints: After removing the spacers, fill the joints with grout or ready-mix mortar to complete the process.
Usage of Tile Spacers
The number of tile spacers required depends on the dimensions of the tiling area and the size of the tiles selected. Typically, the number of spacers used matches the number of joints in the tiled area.
Why Professionals Use Tile Spacers
Tile spacers are essential for several reasons, including:
- Ensuring that the tiles are perfectly level with each other and the floor (tile leveling).
- Achieving precise and meticulous tile installation.
- Preventing uneven levels during installation.
- Avoiding tile breakage by maintaining even pressure distribution.
- Maintaining consistent spacing between tiles.
- Delivering clean and flawless results.
- Offering an affordable and cost-effective solution.
- Providing easy access for contractors and workers.
- Enabling easy transportation and fast production processes.
- Plastic tile spacers can be melted down and reshaped into different forms.
Important Notes
Always remove tile spacers after the adhesive has set but before grouting the joints.
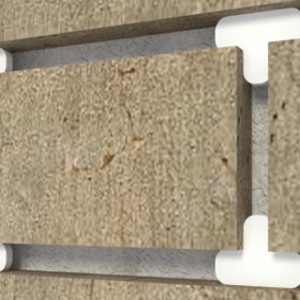
For larger tiles or ceramics, it is recommended to insert one or two additional spacers between the edges of two tiles (by placing one arm of the cross spacer into the joint).

Reviews
There are no reviews yet.