Mosaic Tile Leveler
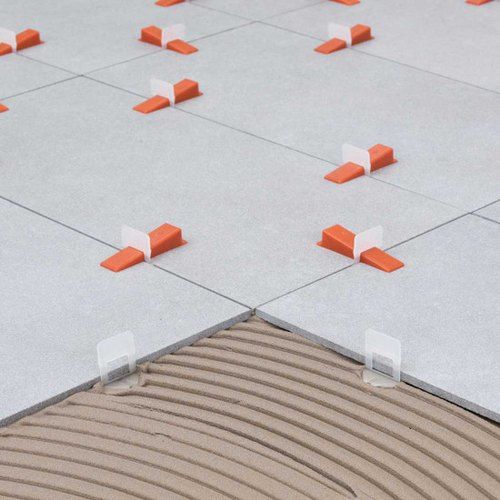
Mosaic tile leveling is an essential aspect of flooring installation, as mosaics have been widely used for flooring for many years. In traditional installation methods, a cement-sand mortar is first spread over the surface using a trowel. The mosaic tiles are then placed on top, and their alignment is adjusted by tapping them with a hammer while continuously checking the level manually. However, with modern advancements, new tools have been introduced for installing mosaic tiles, including the mosaic tile leveler, which ensures proper alignment and leveling. This system consists of two components: a leveling clip and a wedge.
Functionality of the Mosaic Tile Leveler
The mosaic tile leveler not only aligns and levels the edges of adjacent tiles but also ensures a consistent 1.5mm gap between them. The leveling clip is designed based on the standard mosaic tile thickness, which is typically 2 cm. During installation, the clip is placed between two mosaic tiles, and once the tiles are positioned, the wedge is inserted and locked into the clip to secure the tiles.
The advantage of using a mosaic tile leveler over traditional methods is that it eliminates the need for manual leveling. The tiles can be aligned and leveled with greater speed and precision. Additionally, this system prevents lippage at the tile joints, reducing the risk of moss and algae growth in the gaps during cleaning and maintenance.
Overall, the mosaic tile leveler is a highly effective tool that ensures a uniform and stable installation, keeping all tile edges perfectly aligned. It also helps maintain the tiles in a fixed position during installation.
How to Use the Mosaic Tile Leveler
- Surface Preparation:
- Start from a corner of the installation area.
- Use a level and a square to mark a guide line for placing the first tile.
- Apply a suitable adhesive or mortar over an area equivalent to 2 or 3 mosaic tiles using a trowel.
- Tile Placement & Leveling:
- Position the first mosaic tile in the designated spot.
- Place leveling clips around the tile where adjacent tiles will be installed.
- Lay the next tile beside the first one, ensuring that it aligns with the clips.
- Insert the wedge into the clip and use a leveling wrench to lock it securely.
- This process ensures that the tiles are perfectly level relative to each other without requiring manual checks.
- Final Steps:
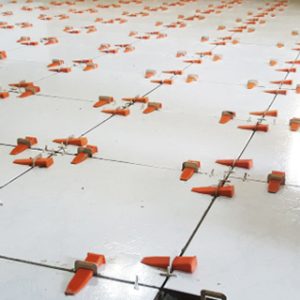
- Continue placing tiles while securing them with clips and wedges until the entire surface is covered.
- Once the adhesive or mortar has fully dried, break the clips by tapping them laterally with a hammer or the tip of a shoe.
- Complete the installation by applying grout between the tiles for a clean and polished finish.
Benefits of Using a Mosaic Tile Leveler
- Facilitates the easy installation of mosaic tiles, ceramics, and stone.
- Eliminates uneven tile surfaces, preventing lippage.
- Ensures a uniform and visually appealing finish by aligning all tiles at the same height.
Usage Considerations for the Mosaic Tile Leveler
The quantity of leveling clips and wedges required depends on the size of the mosaic tiles and the total installation area. Since wedges are reusable, fewer wedges than clips may be needed, especially if the installation is done in multiple phases.
By using a mosaic tile leveler, the quality and aesthetic appeal of the tile work are significantly enhanced. It also prevents uneven edges and ensures consistent spacing between tiles for a professional finish.
Reviews
There are no reviews yet.