
Tile Leveling System
In the process of installing tiles and ceramics, numerous parameters need to be considered to enhance the aesthetic appeal and functionality of the tiles after installation. One of the most crucial factors is ensuring that the tiles are level with one another. Traditionally, tile leveling was achieved by first spreading mortar or tile adhesive onto the surface, then placing the tiles and adjusting their level by tapping them with a rubber mallet while continuously checking the alignment with a leveling tool.
B-Profix, a manufacturer of various tile crosses, tile levelers, and other tiling accessories, also produces nano grout in various colors.
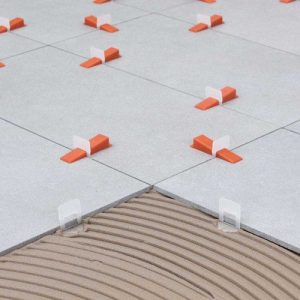
This traditional tile leveling method has drawbacks such as significant time consumption and the potential for tiles to shift or slip due to the impact. To improve tile installation quality and simplify the leveling process, plastic tile leveling components have been introduced. The tile leveling system consists of two main parts: a leveling clip and a wedge. The clip serves as the female component, while the wedge acts as the male component. During installation, the leveling clip is placed between the tiles and secured with the wedge, ensuring perfect alignment. This method eliminates the need for mallets and plumb lines, resulting in a smoother and more precise surface compared to traditional techniques.
Applications of the Tile Leveling System
The tile leveling system can also be used for leveling various types of flooring, including parquet. Proper leveling of tiles not only enhances the aesthetic appeal but also prevents water accumulation during cleaning, reducing the likelihood of dirt buildup and discoloration in tile joints. In general, tile levelers are essential tools for ensuring that tiles are uniformly leveled in any tiling project.
Benefits of Using a Tile Leveling System
- Simplifies the installation process for tiles and ceramics.
- Eliminates height differences between adjacent tiles.
- Ensures even tile installation, enhancing visual appeal.
How to Use the Tile Leveling System
The tile leveling system consists of two parts: clips and wedges, designed for different tile thicknesses. Follow these steps for proper use:
- Select the appropriate size of tile leveler based on the thickness of the tile, ceramic, or parquet.
- Begin tiling from a corner of the designated area, if possible. Use a square, ruler, or laser measure to mark two perpendicular guide lines at a 90-degree angle.
- Spread tile adhesive evenly using a notched trowel.
- Position the first tile according to the marked guidelines and secure it in place.
- Insert leveling clips at the edges of the tile, based on the tile dimensions.
- Place adjacent tiles, ensuring they align with the clips.
- Insert the wedge into the clip’s opening and lock it using a tile leveling plier. This step secures the tiles and ensures they are perfectly level.
- Once the adhesive has set, remove the clips by tapping them sideways with a rubber mallet or shoe tip. The horizontal part of the clip remains under the tile, while the vertical part breaks away.
Determining the Number of Tile Levelers Needed
The quantity of tile levelers required depends on the tile size and installation area. The following guidelines help estimate the necessary number:
Tiles up to 30×30 cm
- Use one tile leveler per edge (placed at the center of each edge).
Tiles between 40×40 cm and 50×50 cm
- Use two tile levelers per edge, positioned 10 cm from each corner.
Tiles between 60×60 cm and 80×80 cm
- Use three tile levelers per edge: two positioned 10 cm from the corners and one in the center.
Tiles larger than 80×80 cm
- Use one tile leveler per 20-25 cm of edge length.
Important Considerations for Tile Leveling
- Select the correct size of tile leveler based on tile thickness. Larger levelers are suitable for thicker tiles, while smaller ones are better for thinner tiles. Using an incorrectly sized leveler may prevent proper wedge locking.
- Allow sufficient drying time for mortar or adhesive before removing the leveling clips. Moving on an unfinished surface may cause tile shifting, affecting alignment.
- Use a specialized tile leveling plier instead of manually inserting wedges. Proper pressure ensures uniform leveling, and hammering wedges may break clips.
- Wedges are reusable, while clips are single-use. If tiling in multiple phases, purchase fewer wedges than clips to optimize cost.
- For large projects, such as 500 square meters divided into two phases, buy half the number of wedges compared to clips for cost efficiency.
Tile Spacer Consumption Guide
The number of tile spacers required depends on tile size:
- Tiles up to 30 cm: 1 spacer per edge
- Tiles larger than 30 cm: 2 spacers per edge
- Larger tiles require more spacers per edge to maintain proper alignment.
Key Notes on Tile Spacers
Not using tile spacers results in uneven joints, leading to surface irregularities (lippage). Uneven surfaces collect water during cleaning, promoting dirt accumulation and dulling the finish. Over time, this can negatively impact the aesthetic appeal of the tiled surface.
By utilizing a tile leveling system, you can achieve a smooth, even, and professional tile installation while enhancing the durability and visual appeal of the flooring.
Reviews
There are no reviews yet.