Roof Switch Box
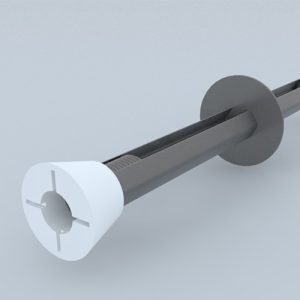
The roof switch box is a plastic component designed to facilitate the installation of ceiling lights and chandeliers. It consists of two parts: the body and the lid. These boxes are placed in the appropriate locations before the concrete pour according to the electrical layout of the building. Once the concrete is set and the molds are removed, the lid is removed from the box, making the installation of ceiling lights and other electrical components easier. The roof switch box has a depth of 5 cm and is made of compressed polyethylene.
Application in Modern Construction Systems
In modern industrial construction, especially when using systems like large panel formwork, tunnel formwork, or hopad systems, the preparation for the installation of ceiling lights or chandeliers should be considered before the concrete pour. In these systems, both walls and ceilings are poured as a single unit, removing the need for columns and beams, and creating a seamless concrete structure. The electrical wiring and provisions for electrical boxes are made prior to the pour, in accordance with the electrical layout. This includes the installation of electrical conduits and ceiling light boxes, ensuring that once the project is completed, wiring and installation can proceed smoothly.
In traditional methods, foam pieces are used to prepare spaces for lighting or chandeliers. After the concrete pour, these foam pieces are removed, and the resulting voids are filled with mortar to complete the ceiling light installation.
How to Use the Roof Switch Box
- After reinforcing the walls and setting the wall forms, the ceiling formwork is installed, and after the spacers are placed, the ceiling reinforcement mesh is spread.
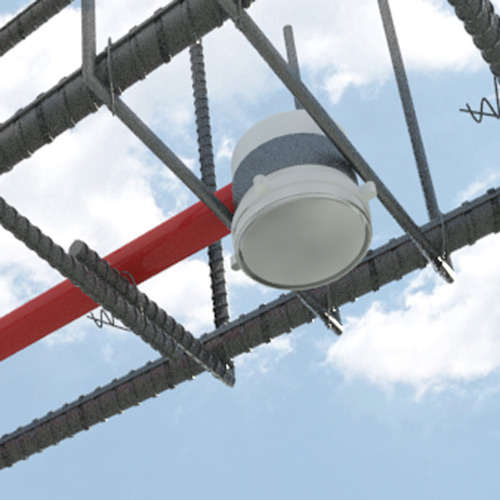
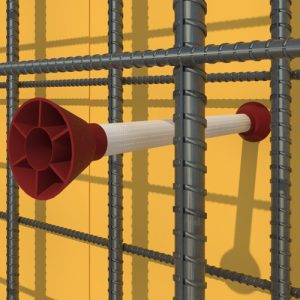
- According to the electrical plan, electrical conduits are placed, and at the locations where ceiling lights or chandeliers will be installed, the roof switch box is positioned and secured.
- The electrical conduits are placed in a “waiting” state, leading to the roof switch box. After the project is completed, electrical cables can be routed through these conduits, following the wiring diagram, to complete the electrical installation.
- The roof switch box comes with a cover to prevent concrete and slurry from entering the box during the pour. Once the concrete has set and the formwork is removed, the cover is taken off, and ceiling light installations can proceed.
Consumption of Roof Switch Boxes
The number of roof switch boxes needed is determined by the electrical layout of the building, the number of ceiling lights, and other systems that require wiring, such as security or fire alarm systems.
Important Notes about Roof Switch Boxes
- Not using the roof switch box before the concrete pour can result in significant costs for cutting openings for ceiling lights or safety devices inside the ceiling.
- Always ensure that the lid is properly placed on the switch box during installation to prevent concrete and slurry from entering. If this is not done, cleaning the box afterward will be difficult, and electrical work on the ceiling will be obstructed.
- The part of the switch box where the electrical conduit is connected should be cut with a saw or hole cutter of the appropriate diameter to allow the conduit to fit into the roof switch box.


Reviews
There are no reviews yet.